Monday, September 24, 2012

Amanda's Study/Hobby Room Before & After

Amanda's little home has a room that is technically the "dining room"....but since there is room in the kitchen to place a small table and chair set she has decided to make this little room her study/hobby (scrapbooking) room.

Here it is "before".......


She painted the paneling on the bottom portion of the walls white....and the top section a dark, beautiful teal....

Here it is "Now".....


She has plans to paint the desk and bookshelves "white" later.

Another angle....


I found this ship for her in a little antique shop in the village.
Kirsten gave her the pineapple...begrudgingly...after she
bought it and brought it home she decided she liked it herself. :)
One last angle.....

Photo taken from the kitchen looking toward the
front living room.
Until next time....

Wednesday, September 19, 2012

Amanda's Living Room Before & After

Here are two photos taken of Amanda's living room BEFORE she started working on it......

Looking at front door - photo taken from staircase leading to bedrooms.

Brown paneling everywhere.......

Looking at coat closet,
on the right -stairs leading to bedrooms
and to the left - entry into study/hobby room.
Now......results of having imagination, vision and a gallon of paint! :) :)


Isn't it precious?  She still isn't finished....but it's well underway.  I believe she is planning to paint/stain the tables a lighter driftwood color and do a frosted glass project to the glass top of the coffee table.  She still has artwork to hang, etc.  Do you see my grand-dogger in the floor....wearing her new pumpkin costume! :)


Another angle....her daddy found the ship artwork at one of the many auctions he now attends.  He also got her the ship wheel (or whatever you call it) hanging on the wall in the other photo from another auction.  The pillows are the set I made....the afghan is one I crocheted for her about 8 or so years ago.  (As of yesterday, she came over and "claimed" a new afghan in ocean blues that I had recently finished and I think she plans to return the pink one to her bedroom....maybe?)  The sofa and love seat are from my front living room....which is now void of furniture. LOL  Once she painted the walls and started placing furniture (and realizing just how small the room truly is)....she batted her puppy dog eyes my way and asked sweetly if she could have my smaller scaled white leather furniture.

Her coffee table and end tables are from a garage sale and the lamps she found at another garage sale for next to nothing.

Across from the sofa is our old big t.v.....which she requested/begged to use....:)  Don't pay attention to the boxes of mini-blinds waiting to be hung...or the extra lamps she is trying to figure out if she will need somewhere in the house.  Remember....she isn't finished completely....but it's getting there! :) :)


The color of her walls are truly an aqua/turquoise...but depending on where you stand and how the sun is coming through....sometimes the walls look more greenish blue.  Either way....it's still beautiful!! :) :)

I'm proud of her and think her "little beach cottage (up North)" is adorable!  I'll reveal another room in a future blog post. :)

Wednesday, September 12, 2012

Sewing Rooms and Quilt Tops, Oh My!

Amanda ALMOST has all of her stuff moved out of her room and into her own place....which means the reality of me having a true blue dedicated sewing room of my very own is soon happening.


All of the girls came home Sunday for dinner and the Steeler game that evening.  Emily looked in the almost empty room and asked if I was planning to paint the walls or leave them that awful, disgusting bright yellow that we allowed Amanda to use several years ago.  LOLOL  Do you really think I'm going to the trouble of painting the walls at this point?  I think NOT!  Yellow (although it IS a very bright shade of yellow) makes me happy. :)


Too bad Pittsburgh didn't win that night...... :(

Oh well...time to change the subject back to important topics....QUILTS!!!! :)

I finally finished all the blocks needed for the quilt that was started during the workshop I attended back in July.......45 Puss In Boots blocks and 45 Hourglass Stars blocks....


I've had them finished for a week or so but couldn't figure out where I was going to find enough space to start laying them out and deciding what order I wanted them to be.....until I started vacuuming my new sewing room floor.....hhhuuummmmmm......


You have no idea how long this took....trying to make sure that blocks were not placed next to blocks with the same fabrics used....plus the wear and tear on my aching back!!!  I literally would lay down one row of blocks and then have to wait an hour before working on the next one. :) :)

I thought the difficult part would be getting the blocks placed in an acceptable order to sew together....NO....the hard part was then deciding what fabric I would use as a border AROUND these 90 - 8 1/2 inch quilt blocks!!!!


There is to be a narrow border around the entire 90 center blocks.... there will be an additional border that is made up of 4 1/2 inch hourglass blocks....then I will possibly place one last border (using the same fabric as the first narrow border) to complete the quilt.

Deciding which fabric to use took 2 days to decide.....I would walk into the room, then walk around the quilt and concentrate on what fabric looked best.  I sent photos over the phone to my friend Marianne for her opinion.  I had each family member give me their opinion.

The winning fabric....miraculously by a unanimous vote is:


What a relief....now I can get everything off the floor and start moving my sewing stuff in.....I'm started to suffer from "sewing withdrawals!"  LOL

Thursday, September 6, 2012

Amanda's New Home

It's official.....Amanda spent her first night in her first "home of her own" last night.  I spent the day yesterday crying off and on. :)  I'm very proud of her, and I remember how exciting it was to move out on my own for the first time....but it's still hard on a mama's heart to see her little chicks move out.


Thank goodness she is only 3.6 miles away!! LOLOL  Yes....I set my odometer to see exactly how far it was from my driveway to her driveway!!!! LOLOLOLOLOLOL

She still has lots to do to the inside before she is ready to reveal all of her hard work....but I can go ahead and share some photos of the outside.

This photo was taken from down the street to show the side of the house.  She doesn't have a neighbor on this side....but the house on the other side is very close. :)


Here is her back porch.....


There are street lights all around.....side walks for walking her dog....she is in an established, safe part of town....and the police department AND the fire department are only 1 block away!  I think she is going to be okay.  There is even a nice, little family owned grocery store a short walk behind her....her property line backs up to a church parking lot. ;)

She is thrilled with it and so excited.  It has 2 bedrooms upstairs, and downstairs she has her living room, dining room (she has turned it into a study with desk and bookshelves), eat-in kitchen and bathroom.  She also has a cellar/basement.

It's small, (approx. 1,000 heated square feet), but I think it's perfect for her.  I believe it was built in 1890.  Amanda thinks it's cool that horse-drawn buggies were driven down the street when it was built. It's fun to imagine all the history to the home.  If walls could speak!! :) :)

Wednesday, September 5, 2012

I've Rubbed Off On My Mom


I'm so proud of my Mom!  It's kind of funny that she was never a "quilter" even though she is an excellent seamstress and even sewed professionally years ago.  She specializes in fancy, over the top pageant gowns, wedding gowns, etc.....but never spent much time doing simple things like making quilts.  But it looks like I am rubbing off on her!! LOLOL

This 9-Patch quilt she made is completely from leftover scraps of fabrics over the years.  You may not be able to tell from the photo....but it is draped over a Queen sized bed.....and it is dragging the floor all around!!!!!!  It should fit their King sized bed wonderfully and still have lots hanging over. :) :)

Mom and I have always joked about all of our "UFO's" (unfinished objects) around our homes.  I've been doing my best over the past couple of years to change my wicked ways and to actually FINISH my projects....and I must admit that I'm quite proud of myself.  Mom said that I have inspired her (LOL) and so she pulled this 9-Patch out and finished it.

You also may notice that she "tied" the quilt rather than "quilt" it.  Mom really has no desire to do any actual hand or machine quilting....but that's okay because "tying" gets the job done just as well.

I asked if I could have this one....but no....this one she has been promising to Dad....and he won't give it up! :) :)

Here is a photo showing the fabric she used for the back.....


Way to go Mom!!!!  So....do I get the next one????   Please???????  :) :) :) :)

Tuesday, September 4, 2012

Flying Geese Wallhanging

I've been keeping busy (translation - whenever I have a few minutes in between other chores, I sit down and sew.)  I'm not sure what is happening, but some days "blogger" does not allow me to upload photos and share new blogs....so I'm behind on my posts.  I'm now playing "catch up"....

I pulled out my stash of 2 1/2 inch strips....


Here is a new wallhanging/table runner that I made using about 13 strips from my stash....


This is a variation of a "Flying Geese" block.  It's supposed to look like a flock of geese heading some where.  I purposely used a cheddar orange fabric as my "geese" and also used the same fabric as my binding.  I originally thought about naming this piece "Homeward Bound"....but the orange reminds me of my home state of Tennessee.....so I think I'm going to call this piece "Tennessee Bound" instead. :) :)

I plan to hang this on the wall in my bedroom once I finish the quilt that was started during the workshop I attended in July.  These same fabrics were used in my quilt top.

Before I put away the scraps....I cut the odds and ends I had left over into 2 1/2" squares.....here are the "bonus" squares I ended up with....now stored and labeled for any future project that needs that size squares.


Hopefully, "blogger" will allow me to continue tomorrow with a new "catch-up" post.....see you next time!

Thursday, August 23, 2012

Pretty but Easy Gift Idea

Dear Blog Readers, I have a challenge for you! :)  I mentioned in a past blog entry that I was asked to consider teaching a quilt class at our local fabric shop.  The shop owner specifically said they needed "small project" classes to offer the public.

This is a project I thought may be appropriate....thus the challenge to you!  Would you like to help me evaluate my teaching skills?  LOL  I figure that if YOU are able to make them using my written instructions and photos...then surely to goodness I can teach it face to face with others. :):)

If you are willing to take on this challenge....send photos of your finished product so I can brag on you and share with everyone who follows this blog:

Email:  grandmaspromise@yahoo.com

PIECE OF CAKE PIECED PLACEMENTS (set of 4)

1)  You will need FOUR different fat quarters.....or FOUR different pieces of fabric that measure 18" x 22" each.  

It's best to choose two (2) darker, one (1) medium and one (1) lighter color fabric that compliments each other.  When choosing your fabrics, you can go with a holiday theme (Christmas, Patriotic, Fall, Valentines, etc., etc.) or choose a focal fabric that would be considered a novelty print (cows, roosters, teacups, etc., etc.)...or just pick colors that you like and match your decor. :)

I decided to make a set of seasonal placemats since Fall is just around the corner....here are my choices:


I'm considering the darker, fall colors, large leaf print as my focal print, with the mottled reddish/orange "solid" as my second darker fabric choice.  The small scale olive check  is my medium color choice and the cream with a small olive vine/leaf design is my light color choice.

2)  Press/iron your fabric pieces to remove all wrinkles.

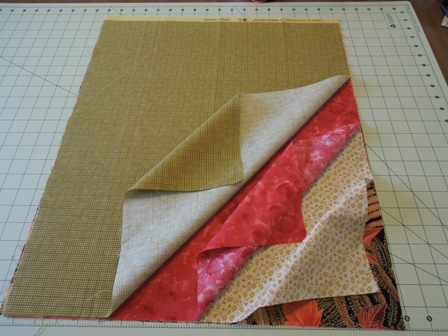
3)  Stack them (right side up) on your cutting mat in the following order....dark (my leaf design), light (my cream), dark (my red mottled) and medium on top (my olive check).


4)  Using a basic 24" long acrylic ruler and your rotary cutter....square up all four sides...


I'm sure we all have "our own way" of squaring fabric up and making sure all sides are even. Use whatever method you prefer. :)

Each person will have a slightly different measurement for their squared up pieces...depending on how much of a sliver of fabric you had to trim from each side to even up all four edges.  My red fat quarter was slightly smaller than all the others, so I had to trim accordingly.

You should end up with a nice stack that is approximately 17 1/2" x 21 1/2"....


5)  We will be making our first cuts up the long (approx. 21 1/2" ) side of our stack.  

Using your long acrylic ruler, measure in 3" to make your first cut.  Since we are cutting through four layers of fabric, make sure your blade is nice and sharp!


We will call this first 3" wide strip as our "A" strip.....


As a safety precaution to make sure I have successfully cut through all four layers of fabric....I always gently lift the stack of uncut fabric away from the cutting line.  If there is a section that I missed, I gently lay it back down and correct my error.  I NEVER move my ruler until I am certain I have a clean cut!!!!!  (P.S.  I often times will place something small and heavy....like my hubby's tape measure above....on my ruler just to help hold it in place while I'm cutting and then making sure the cut included all my fabrics. :)

6)  For our second cut....measure in 2"....


We will refer to this 2" strip as "B" strip...

7)  For our third cut....measure in 2"....


We will refer to this 2" strip as "C" strip.....

8)  For our fourth cut....measure in 4"....


We will refer to this 4" strip as "D" strip ....

The final strip of fabric that is now left will be approximately 5 1/2" to 6" wide...it will be referred to as      "E" strip.

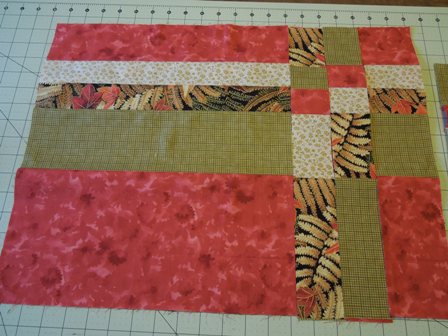
Turn your cutting mat so your strips are now horizontal.  By turning the cutting mat, you can see easily how the placemats should look at this point in the construction...


Now the fun part starts........

9)  Working with "B" strip (second strip from the top)...move the top layer/fabric strip to the bottom of the stack.....


10)  Working with "C" strip (third strip from the top)....move the top TWO layers/fabric strips to the bottom of the stack.....


11)  Working with "D" strip (fourth strip from the top)...move the BOTTOM layer/fabric strip to the TOP of the stack.....


Do NOT move any layers in you're top (A) and bottom (D) sections. :)

Your stack of fabric strips should now look like this.....


To keep from getting confused...it is best to completely construct each placemat top before starting the next one.....sew each strip, right sides together, using a 1/4" seam....

You should end up with something like this.....


Without touching your remaining stacked strips of fabric, the second layer of strips should look like this....sew the strips together....


The third layer of strips should look like this....sew the strips together....


The final layer of strips should look like this....sew the strips together....


12)  Now it's time to take all four of the sewn placemats to the the ironing board and press the seams OPEN.  I know that in the quilting world, we're usually told to press all seams to one side or the other...but in this case, to reduce the bulk of fabric we will be sewing together in the next steps...it makes it easier to simply press all the seams open this time. :) :)

13)  After you have finished ironing all the seams open...bring everything back to your cutting mat and lay each placemat on top of the other...right side up.  


Make sure you get everything straight...with all the seams matched up....you may even want to use a few straight pins to pin the layers together near each seam so they don't slide when making the next cuts.

If you find that the placemats are not quite the same size, you should square them all up at this time just like you did in the beginning.  Thankfully, all four of my mats ended up being the same size so I am able to continue to the next step without any trouble.

At this point, I turned my entire cutting mat around so that the mats now look like this.....

Trust me...because of the cuts we need to now make....turning the cutting mat around (which means our placemats are now upside down)....makes life so much easier as we continue.... :) :)


14)  Using your long acrylic ruler once again, measure in from the left edge of the stack 3" and cut through all four layers....


15)  Now measure in another 2" inches and cut through all layers....


16)  Now measure in another 2" inches and cut through all layers....


This is what your stack of fabric should look like at this point.....


You probably think I'm crazy by now....but just trust me.....turn your cutting mat around one last time so that when you look down at your project it now looks like this....


Remove the pins and let's have some more fun rearranging our strips of fabric.....

Looking at your strip stacks now....(from left to right)....DON'T touch the first very wide strip of fabric on the left.

17)  Move to the second strip of fabric which is 2" wide....move the top two layers of fabric to the bottom of the stack...


18)  Now look at the third strip of fabrics which is also 2" wide....move the BOTTOM layer of fabric to the TOP of the stack....


DON'T touch the last strip of fabric on the right. :) :)

Your project should look like this.....


Do you see the pattern that has emerged before your eyes?  :) :)

19)  Sew the strips together using a 1/4" seam....I found it easier to sew the widest strip (on left) to the strip on it's right together first....etc., etc.

The second layer should look like this....sew the strips together....


The third layer should look like this....sew the strips together.....


The final layer should look like this....sew the strips together.....


20)  Now all four placemat tops are complete....take them to the ironing board and this time you can press all the seams to one side. :)

Now you should have a coordinated, adorable set of four placemats tops....


All that's left to do is finish and quilt as you wish.  I plan to use the "pillowcase" method.  Don't you think these would make lovely gifts?

This idea was taken from a pattern called "TakeFour"...for Something Sew Fine Quilt Design.  

If you enjoyed making this project, you may be interested in purchasing the pattern because it shows you how to come up with a total of 5 different placemat designs simply in the way you cut and flip the strips of fabric used.

As I mentioned earlier...I would truly appreciate hearing from anyone who decides to make this project themselves.  Let me know what you think.  Were the instructions clear?  Did the photos help?  Do you think there is any hope of me being able to teach others how to do this face to face? :)

By the way....I was able to complete these tops (choosing my fabric fat quarters, cutting, sewing and ironing) in one evening.  

Happy quilting!