Finished up the load of laundry that was forgotten and left in the dryer the day before, vacuumed my bedroom, reconciled my bank statement, double-checked to make sure no bills were needing paid this week, loaded the dishwasher with dirty dishes after Kirsten unloaded it and put away the clean dishes, made a quick trip to the grocery store to pick up green beans and potatoes to serve with the ham steaks and biscuits planned for supper.....and.....
I remembered that I needed to cut the binding strips for Amanda's quilt....you know, the one that has been folded and sitting in my bedroom, completely quilted and finished, waiting on the binding and label before I can give it to her to use?
The quilt is 80" x 100" which means I need 360" of binding (plus extra for corners, etc.). I've noticed that every book, pattern and instructor will tell you something different about how wide to make your binding....most common widths are 2 1/4" and 2 1/2"....I've even heard of 3" bindings. Of course, I have to be different. :) I'm cutting my binding strips 2" wide. Why? Because I am planning to attach the binding using my handy-dandy bi-level pressure foot, specifically designed to attach binding and make it look like you did it by hand. :) :)
Most quilters would "eye-ball" and sew the diagonal seam when sewing the strips together....but I'm not most quilters. I am too much of a perfectionist for my own good (and it's not great for time management either). Oh well, I will painstakingly use a pencil to draw my sewing line from one corner to the next. I've found, for me, there is much less ripping out needed when I do this. :) :)
Oh goody....approximately 420" of binding are now sewn together and in one long continuous strip!
Now, all I need to do is iron the seams and also fold the 2" strip in half and iron....leaving me with a nice 1" double fold binding strip to attach to the quilt. I think I'll set this aside and do the tedious ironing later.
Before calling it a day, I think I'll start to work on a set of 4 placements for Amanda. She is planning a "beach themed/nautical" decor. She wants her kitchen and dining area to be more of a fun, colorful beach look and then have a more mature nautical look in her living room.
I spotted this cute fabric in the clearance bin one day and there was only a yard left on the bolt....perfect for placemats. :)
There was another fabric (again, only one yard left) next to it and I purchased both fabrics with the intention of making reversible placemats...a different look for whatever mood she was in....
I think my intentions were better than the quality of the second fabric (above). I should have paid more attention to the "feel" of the fabric before purchasing them. The first fabric was a nice quality but once I started working with the second fabric, I realized how cheesy and cheap it felt. I went ahead and cut out the pieces for the placemats, but when I attempted to iron the cheesy blue piece, it shrunk and the shape became distorted. I've NEVER had that happen to me before....to have a fabric shrink and distort simply by ironing it? Well....I'm glad it happened before I used it for the placemats. Needless to say, I put it aside (this may actually be the first time in my life that I may throw away the equivalent of 1 yard of fabric).
I ran to my fabric stash and pulled out some white muslin to back the placements....the idea of reversible placemats is out the window this time. :(
I cut the focal fabric (tan beach) into four pieces measuring 14 1/2" x 18" rectangles. (Once sewn, using 1/4" seams, will result in finished placemats approximately 14" x 17 1/2".
I'm taking the easy route with this project......I want to sew them together (along with the batting) like you would a pillow and turn them inside out, so no binding is needed...so I stack them in this order:
Bottom: Batting
Middle: Backing (white muslin) - right side UP
Top: Focal Fabric (tan beach) - right side DOWN
You may notice that I cut the backing fabric and the batting just a tad larger than the placemat fabric and will trim it accordingly once all three layers are sewn together.
Top fabric and middle fabric, right sides together.....
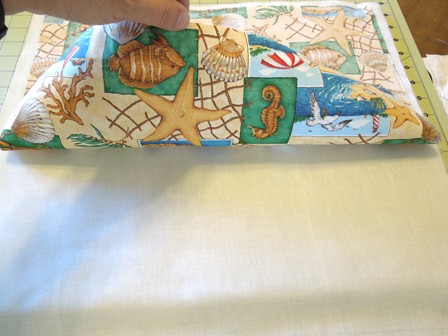
Then batting on the bottom.....
Now all four placemats are assembled, pinned together and ready to be sewn together.......don't forget to leave an opening on one end that is large enough to get your hand through so you can turn the placemats inside out and use your finger to push out the corners nice and neat... :) :) :)
Placemats are sewn together...now it's time to trim the batting and muslin (backing fabric) to match the top fabric.....
All that's needed now is to turn the placemats "inside out", sew along all four sides to close up the opening needed to turn them and make the entire placemat neat and tidy....and do any quilting you desire to finish the project.
Sounds like a job for tomorrow.....it's bedtime now.
Tuesday, August 14, 2012
Sunday, August 12, 2012
Pillows & Flooring & Repairs, Oh MY!
To say we've had a busy weekend is an understatement by far! On Friday, the original plans were for the entire family to go to Ray's company "family day" picnic from 4pm - 8pm. The weather was yukky (rain and storms) so we opted out of the picnic. :) The rain gave Ray the perfect excuse to go to another auction (his new favorite hobby).
I spent the evening sewing more dog bed pillows. As I started to put away the fabric the other day after Amanda made my new grand-dogger a new bed....I decided that my own (much smaller) dogs deserved some new beds also. So, before I carried the huge box of poly-fil back downstairs, and put away the flannel fabric....I quickly put together a few......
I made them the perfect size to fit in their bedtime kennels. Tanner likes his so much that he jumped right in and took a nap..... (yes, the blue painters tape is STILL on the walls from when Ray painted the baseboards a month or so ago!!) LOL
Speaking of Ray and his "honey-do list". I've been asking him to remove the carpet in the living room for some time now. He decided to tackle the removal of the carpet yesterday morning.
When we purchased the home six years ago, the realtor said that the parkay wood flooring in our dining area carried on into the living room. The condition of the dining room floor is okay....not great, but not terrible either. At this point, I figured I would be happier with "okay" parkay wood floors then the current old, stained carpet. I assumed the flooring in the living room would be the same, if not better. WRONG!!! LOL
NOW we know why the previous owner had put carpet on the floors! I could have handled scratched, scuffed, stained, gouged, yukky wood flooring......but.....we weren't exactly prepared to find THIS! LOLOLOLOL
The entire center of the room was MISSING the wood flooring!!!! Yep, that's right....MISSING!!!!
I laughed until I cried....this is SO typical for us....just another day in the life of "if it can go wrong, it will". There's no need to be upset, it is what it is....but the dogs are a little confused! :)
Even in places where the parkay is still there....it is a danger zone....just look.....
I'm really surprised that I'm not upset....but I'm truly not! :) We will just have to deal with it for a while (probably a LONG while) until we save up enough to put new flooring down. It's a good thing Ray already knows how to do it....he will be a pro by the time this house is ever put back together! :) :)
As Ray finished the carpet removal, I had to leave and head to Ithaca, NY about an hour away. I had enrolled to take a Singer Featherweight basic repair class at the Quilter's Corner fabric shop. A few months ago Ray had brought home a 1947 Singer Featherweight from an auction to add to my collection. The motor ran but I couldn't get it to sew a stitch.
During the class, I surprised myself! I took that baby completely apart (parts literally laying all around me), cleaned up all the years of goop accumulated inside, cleaned, oiled and lubricated everything, put it back together, tweaked the tension and a few other little things. (Even cleaned and polished the outside.)
Shazzzzammm....it not only worked....but it sews like a dream with a perfect, pretty stitch. The motor purrs like a kitten. It runs quieter and sounds better than the one I took to a repairman to have serviced! :) I feel EMPOWERED!!! I am woman, hear me ROAR! :) :) :)
And the best part? I ended up saving quite a bit of money! The class fee was $20.00 and I repaired it myself. My local repairman charges $85.00 for general servicing.
Ray actually acted impressed with my accomplishments and said he was proud of me!! :) :) I think he was most impressed with the money I ended up saving by learning to do it myself. LOL
Look at my pretty, shiny 1947 Featherweight....
I plan to teach Kirsten to use this machine. We already have several projects in mind to keep her busy this school year.
Now for a day of rest!
I spent the evening sewing more dog bed pillows. As I started to put away the fabric the other day after Amanda made my new grand-dogger a new bed....I decided that my own (much smaller) dogs deserved some new beds also. So, before I carried the huge box of poly-fil back downstairs, and put away the flannel fabric....I quickly put together a few......
I made them the perfect size to fit in their bedtime kennels. Tanner likes his so much that he jumped right in and took a nap..... (yes, the blue painters tape is STILL on the walls from when Ray painted the baseboards a month or so ago!!) LOL
Speaking of Ray and his "honey-do list". I've been asking him to remove the carpet in the living room for some time now. He decided to tackle the removal of the carpet yesterday morning.
When we purchased the home six years ago, the realtor said that the parkay wood flooring in our dining area carried on into the living room. The condition of the dining room floor is okay....not great, but not terrible either. At this point, I figured I would be happier with "okay" parkay wood floors then the current old, stained carpet. I assumed the flooring in the living room would be the same, if not better. WRONG!!! LOL
NOW we know why the previous owner had put carpet on the floors! I could have handled scratched, scuffed, stained, gouged, yukky wood flooring......but.....we weren't exactly prepared to find THIS! LOLOLOLOL
The entire center of the room was MISSING the wood flooring!!!! Yep, that's right....MISSING!!!!
I laughed until I cried....this is SO typical for us....just another day in the life of "if it can go wrong, it will". There's no need to be upset, it is what it is....but the dogs are a little confused! :)
Even in places where the parkay is still there....it is a danger zone....just look.....
I'm really surprised that I'm not upset....but I'm truly not! :) We will just have to deal with it for a while (probably a LONG while) until we save up enough to put new flooring down. It's a good thing Ray already knows how to do it....he will be a pro by the time this house is ever put back together! :) :)
As Ray finished the carpet removal, I had to leave and head to Ithaca, NY about an hour away. I had enrolled to take a Singer Featherweight basic repair class at the Quilter's Corner fabric shop. A few months ago Ray had brought home a 1947 Singer Featherweight from an auction to add to my collection. The motor ran but I couldn't get it to sew a stitch.
During the class, I surprised myself! I took that baby completely apart (parts literally laying all around me), cleaned up all the years of goop accumulated inside, cleaned, oiled and lubricated everything, put it back together, tweaked the tension and a few other little things. (Even cleaned and polished the outside.)
Shazzzzammm....it not only worked....but it sews like a dream with a perfect, pretty stitch. The motor purrs like a kitten. It runs quieter and sounds better than the one I took to a repairman to have serviced! :) I feel EMPOWERED!!! I am woman, hear me ROAR! :) :) :)
And the best part? I ended up saving quite a bit of money! The class fee was $20.00 and I repaired it myself. My local repairman charges $85.00 for general servicing.
Ray actually acted impressed with my accomplishments and said he was proud of me!! :) :) I think he was most impressed with the money I ended up saving by learning to do it myself. LOL
Look at my pretty, shiny 1947 Featherweight....
I plan to teach Kirsten to use this machine. We already have several projects in mind to keep her busy this school year.
Now for a day of rest!
Thursday, August 9, 2012
NO She DIDN'T!!!!!!!
What have I been up to? At this point, I can say that all 360 half-square triangles are now sewn together.....180 brown triangles to 180 neutral triangles = 180 2-1/2" squares....
....and I do mean simply sewn together. :)
Are the "dog ears" trimmed? NO
Have they been ironed? NO
Have they been cut and separated from each other (because of continuous chain feed sewing)? NO
Just sewn together...
I naively thought I was moving forward at a pretty good pace....but alas, I learned that I was in for a rude awakening.
Why do you sense such sadness in my post today? (LOL)
It's because I am in SHOCK! While I have been slaving away, putting as much time as I can possibly squeeze out of my days into sewing.....with still SO MUCH to do.....
SOMEBODY I know has obviously set a goal to "beat me".......
I received a "picture mail" on my cell phone and when I opened it up to view, this is what appeared before my weary eyes.....
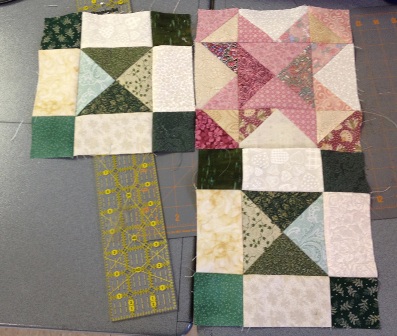
Sweet, calm, cool and collected Marianne has completely finished the blocks needed for the center of her quilt she JUST STARTED TWO WEEKS AGO AT THE QUILT WORKSHOP!!!!!
Okay...okay....I need to be serious for a moment. Isn't it BEAUTIFUL!!! I'm so proud of her! I'm just in awe of the use of her "scraps" and the color placement. Can you see the pattern that has evolved...whether by accident or design, simply in how she chose to place the individual blocks? Do you see the stars coming down the center of the quilt with hour glass centers in purples and then how they "burst" out from the center extending to all four corners? The purples, blues, greens, neutrals, and of course the spectacular reds all fit and compliment each other...makes me think of tons of cousins at a family reunion! :) :) :)
GREAT JOB MARIANNE! So...I've been thinking....do you want to trade quilt tops??? LOLOLOL
I'm sure that everyone else reading this blog will be just as excited as I will be to see the finished product....when she adds the border and additional blocks, etc.
BRAVO Marianne!
By the way...I truly am sewing as fast as I can....but don't expect any miracles now coming from my direction with photos of a completed quilt top any time soon!!!!! :) LOLOL
....and I do mean simply sewn together. :)
Are the "dog ears" trimmed? NO
Have they been ironed? NO
Have they been cut and separated from each other (because of continuous chain feed sewing)? NO
Just sewn together...
I naively thought I was moving forward at a pretty good pace....but alas, I learned that I was in for a rude awakening.
Why do you sense such sadness in my post today? (LOL)
It's because I am in SHOCK! While I have been slaving away, putting as much time as I can possibly squeeze out of my days into sewing.....with still SO MUCH to do.....
SOMEBODY I know has obviously set a goal to "beat me".......
I received a "picture mail" on my cell phone and when I opened it up to view, this is what appeared before my weary eyes.....
Sweet, calm, cool and collected Marianne has completely finished the blocks needed for the center of her quilt she JUST STARTED TWO WEEKS AGO AT THE QUILT WORKSHOP!!!!!
Okay...okay....I need to be serious for a moment. Isn't it BEAUTIFUL!!! I'm so proud of her! I'm just in awe of the use of her "scraps" and the color placement. Can you see the pattern that has evolved...whether by accident or design, simply in how she chose to place the individual blocks? Do you see the stars coming down the center of the quilt with hour glass centers in purples and then how they "burst" out from the center extending to all four corners? The purples, blues, greens, neutrals, and of course the spectacular reds all fit and compliment each other...makes me think of tons of cousins at a family reunion! :) :) :)
GREAT JOB MARIANNE! So...I've been thinking....do you want to trade quilt tops??? LOLOLOL
I'm sure that everyone else reading this blog will be just as excited as I will be to see the finished product....when she adds the border and additional blocks, etc.
BRAVO Marianne!
By the way...I truly am sewing as fast as I can....but don't expect any miracles now coming from my direction with photos of a completed quilt top any time soon!!!!! :) LOLOL
Wednesday, August 8, 2012
Craziness and Light Bulb Moments
I know I'm crazy. Everyone I meet thinks I'm crazy. My mind is constantly "thinking up stuff".... sometimes I worry that my thinking has gone too far. :)
Let me explain.....
I've been trying to work on my quilt blocks that were started at the workshop two weeks ago (WOW...has it only been two weeks!!!)....oops...sorry....my mind started to wander there for a second but I'm in control again. LOL
My Singer Featherweight has enjoyed a place of honor on my kitchen table this entire time (except for the one evening it took to make the dog bed). Do I get to sit and sew non-stop throughout my days on earth....I think NOT! I'm a busy wife, mother, multiple dog owner, chief cook, laundress, taxi driver, homeschool teacher and I crochet and sew preemie sized clothing for donation through our ministry called Grandma's Promise. Basically, what this boils down to is the fact that my sewing spurts are exactly that...SPURTS. I carry a load of laundry downstairs and get it started, I come back upstairs, I sit and sew a few triangles or squares together, then I open the door to let the dogs out, then I sit back down and sew a couple more pieces, then I go open the door to let the dogs back inside, then I sit and sew a few pieces, then the laundry is ready to be transferred to the dryer....I think you get the picture.
So, what have I been up to the last little bit? Well, last week I was able to finish sewing up the 696 individual triangles which resulted in the 174 hour glass center blocks needed. Of course, this meant I was ironing all of these seams also.
But over the past weekend and into this week, I've been sewing together the 180 flying geese segments needed for the blocks called "Hour Glass Star" required for the quilt top.
This means I had to sew 180 little triangles (or we could call them "wings") to the RIGHT side of the center triangle (we can call the "goose"). LOL
And don't forget we have to press this right wing open before sewing on the 180 little triangles (or "wings") to the left side of the "goose"!!!
Then press again....
And I almost forgot to mention that we also have to trim off the "dog ear" points once pieces are sewn together.....
Which leads into my light bulb moment....literally....that also proves I'm completely crazy!!!!!!!
As I'm sitting at my kitchen table, in front of my sewing machine, happily trimming "dog ears"....
I just happen to glance down into my cute little, handy, dandy, "snip-it" bag that contains all of my clipped threads and "dog ears"....
I start thinking....."aren't all the colorful little snippets adorable?"
Then I have to actually touch them....
My little bag actually has quite a collection of these little pops of color....I don't want to throw them away....what can I do with them.....hummmmmmmmm
Be prepared....light bulb moment has arrived......I wonder if I could take a clear glass Christmas ornament and stuff these little boogers inside and create an adorable, colorful, warm, ornament. Maybe I'll even have enough from this particular quilt to fill one glass ornament, then I could use a pretty marking pen to write the year and name of the quilt the scraps came from as a "memory ornament"!!!!!!!
What do you think? Does it sound like it might work? Do you think the idea has potential?
You know what this means, don't you? I will be watching for the next 50% off coupon for Michael's Craft Store and buying a clear glass Christmas ornament to give it a try and see if it works!!!
Until next time.......
Let me explain.....
I've been trying to work on my quilt blocks that were started at the workshop two weeks ago (WOW...has it only been two weeks!!!)....oops...sorry....my mind started to wander there for a second but I'm in control again. LOL
My Singer Featherweight has enjoyed a place of honor on my kitchen table this entire time (except for the one evening it took to make the dog bed). Do I get to sit and sew non-stop throughout my days on earth....I think NOT! I'm a busy wife, mother, multiple dog owner, chief cook, laundress, taxi driver, homeschool teacher and I crochet and sew preemie sized clothing for donation through our ministry called Grandma's Promise. Basically, what this boils down to is the fact that my sewing spurts are exactly that...SPURTS. I carry a load of laundry downstairs and get it started, I come back upstairs, I sit and sew a few triangles or squares together, then I open the door to let the dogs out, then I sit back down and sew a couple more pieces, then I go open the door to let the dogs back inside, then I sit and sew a few pieces, then the laundry is ready to be transferred to the dryer....I think you get the picture.
So, what have I been up to the last little bit? Well, last week I was able to finish sewing up the 696 individual triangles which resulted in the 174 hour glass center blocks needed. Of course, this meant I was ironing all of these seams also.
But over the past weekend and into this week, I've been sewing together the 180 flying geese segments needed for the blocks called "Hour Glass Star" required for the quilt top.
This means I had to sew 180 little triangles (or we could call them "wings") to the RIGHT side of the center triangle (we can call the "goose"). LOL
And don't forget we have to press this right wing open before sewing on the 180 little triangles (or "wings") to the left side of the "goose"!!!
Then press again....
And I almost forgot to mention that we also have to trim off the "dog ear" points once pieces are sewn together.....
Which leads into my light bulb moment....literally....that also proves I'm completely crazy!!!!!!!
As I'm sitting at my kitchen table, in front of my sewing machine, happily trimming "dog ears"....
I just happen to glance down into my cute little, handy, dandy, "snip-it" bag that contains all of my clipped threads and "dog ears"....
I start thinking....."aren't all the colorful little snippets adorable?"
Then I have to actually touch them....
My little bag actually has quite a collection of these little pops of color....I don't want to throw them away....what can I do with them.....hummmmmmmmm
Be prepared....light bulb moment has arrived......I wonder if I could take a clear glass Christmas ornament and stuff these little boogers inside and create an adorable, colorful, warm, ornament. Maybe I'll even have enough from this particular quilt to fill one glass ornament, then I could use a pretty marking pen to write the year and name of the quilt the scraps came from as a "memory ornament"!!!!!!!
What do you think? Does it sound like it might work? Do you think the idea has potential?
You know what this means, don't you? I will be watching for the next 50% off coupon for Michael's Craft Store and buying a clear glass Christmas ornament to give it a try and see if it works!!!
Until next time.......
Tuesday, August 7, 2012
Grand-dogger Needs A Bed
Introducing Kiara....my new grand-dogger! My daughter Amanda just adopted her first baby and she is a Boxer/Bulldog mix. Kiara is only 10 weeks old and is already bigger than my house full of little dogs (Mi-Kis and Mini-Schnauzer).
Amanda and Kiara will be moving into their own home in the next couple of weeks. Amanda has just graduated college, is starting a new job in her career field and is ready to "be a grown up". Part of this transition is to move out on her own for the first time....and she wanted a dog...a BIG dog...to help her feel safe as she gets used to this next phase of her life.
It probably won't surprise you to learn that I babysit Kiara each day while Amanda goes to work....yes, just what I needed right now....to house train a BIG baby!!!!! Actually, I'm not complaining because if we are going to have a GIANT in the family, I want her to grow up around my little dogs and give them all the opportunity to know and accept each other.....so far so good. It's actually kind of funny watching a 4 or 5 pound adult Mi-Ki put an 18 pound puppy in her place.
Amanda has all the basic supplies for Kiara except a dog bed. I suggested she make one herself...one that was big enough for now and once we see how big Kiara actually ends up being....she can make her a bigger one. Amanda has used a sewing machine a few times when she was a little girl....taught by her grandma (my mom). But she has refused to touch a sewing machine or let me teach her anything once she reached the teenage years. So, to be honest, I was using this opportunity to force her to sew again...in the hopes it would light a fire under her and show her what she has been missing! LOLOL
Amanda is very thrifty (just like her momma)....she isn't even picky...especially when she knows she can get the fabric and stuffing free from my stash! :)
Yes, I know, everyone is probably wondering why I have tons of orange flannel, with skateboarders all over it in my stash....well, I can explain! :) A few months ago I made a purchase on Ebay for an assortment of flannel pieces (all at least 1 yard pieces) to use in backing preemie sized baby blankets for donation to my ministry called Grandma's Promise. While corresponding with the seller, I shared with her what I would be using the flannel for....and when the box arrived on my doorstep...it had three times the fabric that I had actually purchased. She included a note saying she had decided to throw in whatever flannel fabric she still had as a gift. Most of the designs were suitable for the baby blankets, but there were a few pieces (like this one) that I wasn't sure what I'd ever make with it. I have SEVERAL yards of this particular flannel. :)
Now to teach Amanda how to use a rotary cutter.....
So far, so good....no missing fingers in the process!
Now the fun part. I decided to set up my Pfaff instead of my Singer Featherweight because of the nice little "extras" that would help her out. For instance, I pushed the "slow speed" button so she that when she pushed the foot pedal (like she drives her car), it wouldn't speed off and scare her to death.
I also set the "needle down" button so that every time she stopped, the needle would remain in the fabric. And I even set the "lock-in stitch" button so that I didn't have to worry with having her sew forward, then reverse to lock in her stitch. (All of that can come in later lessons...I just wanted her to enjoy sewing again...so I wanted it to be as easy as can be this time. :)
Never in my life have I ever witnessed anyone sewing with one leg crossed over the other....but then again, I wasn't watching my daughter either.
I cracked up when I walked around to the front of the machine and looked down to see this....
First part of sewing is complete...now time to stuff........
I know what you all are thinking....you can't believe I have a huge 10 lb. box of poly-fil just hanging around. Well, it's true....just look close and do you see how the blue on the box is a lighter color at the top? Well, the darker blue color is what happened when the downstairs flooded last year and the cardboard box soaked up water. I lost a lot of craft items during that flood....but this was a brand new box and thankfully, the plastic bag inside was strong and didn't have any holes or tears in it....so my poly-fil survived the flood!!!!!!! I'll let you in on one more secret. This box is and was the only time I ever purchased poly-fil in bulk. I assumed there were 10 individual bags of poly-fil (like you would purchase at the store) stuffed inside the box...I was wrong. When we opened the box last night and untied the plastic bag....POOOFFFF.....it didn't take the poly-fil a skinny minute to explode out of the box!!! It scared both of us!! LOLOL
Before I knew what had happened, Amanda had that bed stuffed so full, Kiara would have rolled off it if she tried to lay down. I gently asked Amanda if she thought Kiara would want it a little fluffier instead of so firm. She stood up, placed it on the table and tried to push down on it....then just started laughing. She realized what she was doing and started pulling out poly-fil and putting it back in the bag. :)
Now to sew and close up the one side left......
Success!!!! Amanda is so proud of herself!!!!
My insisting Amanda make the dog bed herself accomplished exactly what I had hoped....Amanda is already thinking of all the things she can make herself now (including a long body pillow for herself, stuffed as firm as she wants it).
We have proof that Kiara loves it....
It didn't take 5 minutes before her eyes started getting droopy.....
And droopier.....
Sleep little baby....
Until next time.....
Monday, August 6, 2012
Lucy & Ethel Quilting Adventures Part 4
Well, I believe it's time to "wrap up" our fun time at the quilting workshop. It was bittersweet to pack up our sewing machines and say goodbye to Bonnie Hunter and all the other new quilting friends we had met.
As Marianne was driving back to our hotel, she asked if I would like to stop at the local quilt shop in Wellsboro, PA that we had heard nice things about...before they closed for the day. Well, OF COURSE I wanted to stop by the quilt shop....why would I pass up an opportunity to look at fabrics!! LOL
As we walked down the sidewalk and neared the shop door, we noticed an antique baby buggy outside filled with bolts of fabric. What????? Does that little sign say "CLEARANCE"?!?!?!?! I don't know who made it to the baby buggy first, me or Marianne, but soon our arms were loaded with NICE fabrics marked down at least 75%. :)
We found a couple more sale items inside the store, enjoyed "dreaming" of future projects in which we could use these new fabrics, chatted with the sales staff and all the other quilters we already knew. (Yes, Marianne and I were first, but a slow trickle of ladies started entering the shop that had been at the quilt workshop....I guess all quilters think alike....or maybe we just all love to shop!:)
Once we were back in our hotel room, Marianne caught me smelling my new fabric.
Yes, SMELLING my new fabric. I do that quite often! LOLOL The smell of new fabric makes me happy! I honestly don't think at that point in time that Marianne had ever thought to do something this weird.
But later that evening, when she thought I was doing something else....I caught her sitting on the sofa doing the exact same thing....so glad I had my camera in my pocket!
Does it smell good Marianne???? LOLOLOLOLOL
As this saga comes to an end...I will leave everyone with photos of the quilt blocks made by others attending the workshop. I always enjoy seeing how different everything looks based on the fabrics we choose.
The workshop saga may have ended, but this blog certainly has not. So continue to check in with me and see what is keeping me busy! :)
Until next time.....happy quilting!!!!
Subscribe to:
Posts (Atom)