
I hesitate to say I "designed" this block because I'm sure there are hundreds of very similar blocks out there somewhere...but I will say that I've never come across a block identical to this, or constructed in the same manner. This block measures 12 1/2" unfinished, 12" finished.

My inspiration was a large piece of very old star print (almost 2 yards), being a member of a very patriotic family, and a desire to create something using this one fabric and any additional scraps I could come up with from my stash to celebrate future patriotic holidays.
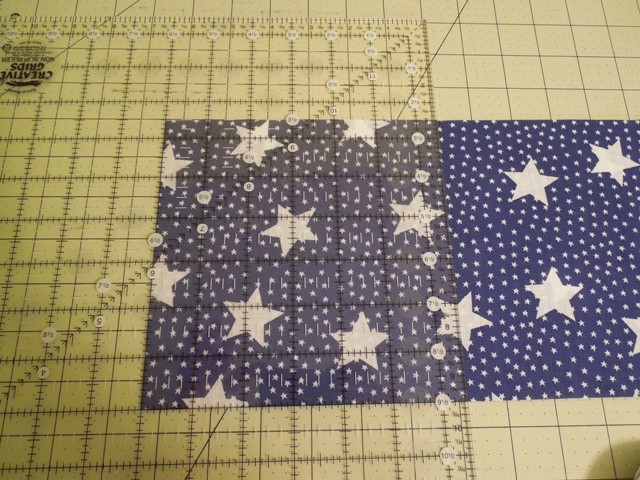
From the blue stars fabric, cut 6 1/2" strips WOF (width of fabric).
Then sub-cut into 6 1/2" squares. (Helpful hint: 1 yard of fabric will yield approx. 30 - 6 1/2" squares)
Next, cut an assortment of red fabric into 2 1/2" strips. Cut equal amounts of 2 1/2" strips in an assortment of white, cream or light tan fabrics.

After pressing any folds and creases out of the strips, then lay one red and one neutral 2 1/2" strip together, facing each other.

Using the Easy Angle ruler, place the ruler on the fabric strips, at the 2 1/2" line marker. Cut with rotary cutter.
*** I use my Easy Angle ruler for just about everything, but if you do not have one...the traditional way to get the same size triangle pairs is to cut 1 RED piece of fabric that is 2 7/8" square and 1 NEUTRAL piece of fabric that is 2 7/8" square, place both squares face to face and cut once on the diagonal - yielding 2 sets of triangles.
Next pivot the ruler to make next cut....

Notice that you use the 2 1/2" mark and that the black tip of the ruler extends past the 2 1/2" wide fabric strips. (Yes, that is a Klutz glove on my left hand. I learned the hard way that it's better to be safe than sorry when using rotary cutters.)

Continue cutting pairs of these red & neutral triangles.
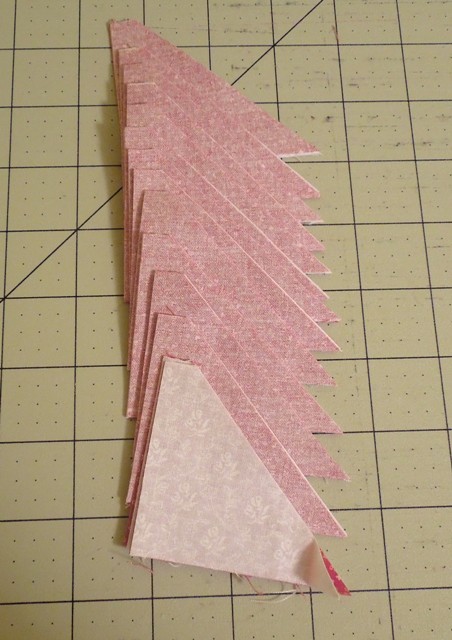
For each Scrappy Patriotic Flag Block you will need 27 sets of these triangles.
(Helpful hint: a 2 1/2" WOF strip will typically yield 25 - 26 triangles using the Easy Angle ruler)
Next is the fun part...using a scant 1/4" seam allowance, chain piece the triangle sets.

Notice that because you placed the red and neutral fabric face to face before cutting, the triangle sets are already matched and ready to sew which is a huge time saver.

All quilters have their preferences on when they trim the dog ears, but I prefer to go ahead and do the clipping at this time before pressing the blocks open.

Next, set the seams and press with seam allowance toward the red fabric.

Now it's time to play with the arrangement of our scrappy red/neutral squares. Arrange 3 sets of "blocks", each made up of 9 red/neutral squares.
You will begin by sewing rows of 3 together.

Press the seams in opposite directions so the seams will nest and fit together nicely.

After pressing, sew the top row of 3 blocks to the center row of 3 blocks. I match the seams and pin so that the seams line up perfectly when sewing together.
Then sew the bottom row of 3 blocks to the top two. Press seams. This "section" of 3 rows of 3 squares each should measure 6 1/2" square.

Piece together the remaining two sets of 9 red/neutral squares.
Each set of 9 red/neutral blocks should measure 6 1/2" just like the blue star square.

Sew the blue 6 1/2" square to the top right section of 9 red/neutral triangle squares. Press seam towards the blue square.
Sew the bottom left section of 9 red/neutral triangle squares to the bottom right section. Press seam towards the right section of 9 red/neutral triangles.

Finally, sew the top half to the bottom half. Press seam towards top half.
At this point, finished block should measure 12 1/2" square.
Because I intend for my blocks to truly be constructed with scrappy reds and neutrals, it may take a little while before I have enough blocks constructed to complete a quilt top.
I will update this tutorial with quilt top directions as I design it...so please check back periodically to see what happens. Unless I change my mind, I'm picturing sashing between the blocks...possibly sky blue and then an outer border to complete the look. Time will tell. :)
Happy Quilting!
Like this may try it
ReplyDelete